A Copy Files App using JavaFX
May 24, 2017
1. Overview
This is an example of a copy utility program built using JavaFX. This has a GUI to browse the file system, select files and directories to be copied to a specified target directory. There are options to filter the files by file extension and by the file's last modified date. The copied files can be optionally compressed and archived to a ZIP file.
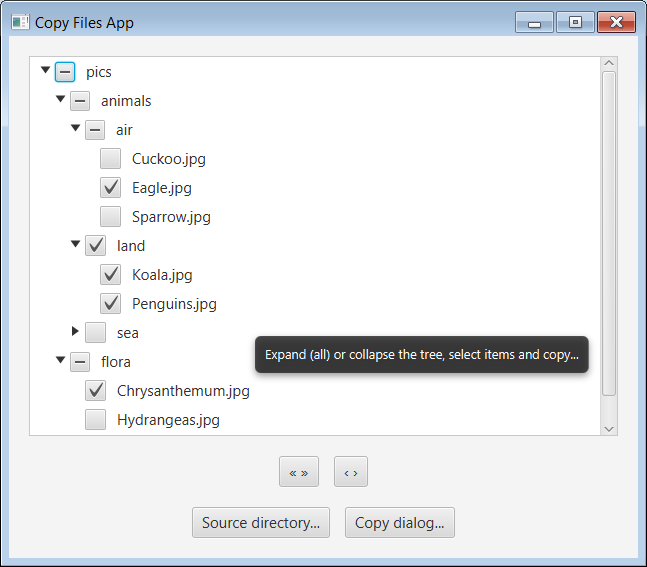
The app is built using JavaFX 8; Java SE 8 includes JavaFX. The finished app's main GUI looks like in the screenshot shown below:
The app is detailed in following sections:
- The File Tree: The main GUI, file tree view, tree items, and tree actions
- Copy Files Dialog: The dialog and its functions
- Copy Files: The copy process, the task and its states and files copy routines
- The Application: JavaFX application launcher and details on ZIP file creation and logging
The Java source code for the application can be downloaded from the Download section below.
2. The File Tree
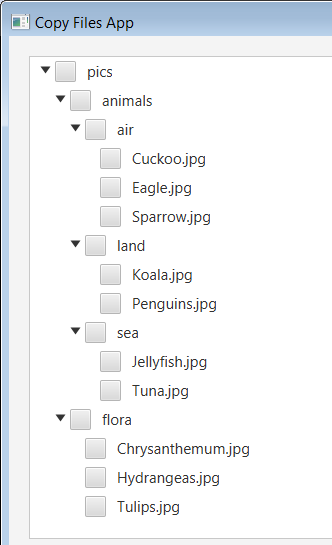
The app's main window (see the picture above) shows a file tree with directories and files as tree items; the file system is shown with directories and files with a root directory and the remaining as its children. The app allows the user to select a root directory, the top of the file hierarchy, at the start. The tree items (the files and directories) are displayed as check boxes with file names.
There are buttons to expand or collapse the entire tree or just one or more selected directory items.
The user selects (checks the checkboxes) the entire tree or the required directory and file items and initiates the copy. The copy action shows a dialog with a status area, and buttons to select a target directory, file filters and perform the copy. The selected files in the main view are filtered and copied to the target directory.
2.1. The Tree View
The file tree is built using a TreeView control. A file's path, the Path object is the type of the item for the TreeView. The tree is constructed as follows:
TreeView<Path> tree = new TreeView<>(rootItem);The TreeView's constructor accepts a root item and builds the tree. In this app, the root is a chosen directory with files and directories. The items are specified by TreeItem. The items are shown as CheckBoxes with file names and they are defined by CheckBoxTreeItem<Path>; this extends TreeItem. In this app a custom tree item class FileTreeItem is used (the following section 2.2. File Tree Items has details).
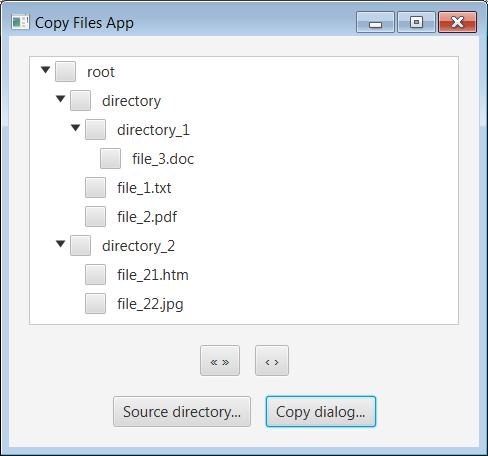
The picture below shows the app's main view with a file tree. The tree has a root directory item. There are directory items and within them file and directory items.
A DirectoryChooser is used to select the initial root directory. This control provides a GUI for navigating the file system and allows the user to choose a directory. This chooser is launched at the start of the app.
To change the root directory there is a button (Source directory...) to open the chooser and choose another root. Note that the root directory is also referred as source directory. The following code snippet shows the button's configuration.
Button sourceDirBtn = new Button("Source directory...");
sourceDirBtn.setOnAction(actionEvent -> {
    chooseSourceDirectory(primaryStage);
    tree.setRoot(getRootItem());
});
The following code snippets show the root item and tree view construction respectively:
private FileTreeItem getRootItem() {
    FileTreeItem rootItem = new FileTreeItem(rootDir);
    rootItem.addEventHandler(
        CheckBoxTreeItem.<Path>checkBoxSelectionChangedEvent(),
            (TreeModificationEvent<Path> e) -> handleItemCheckedEvent(e));
    return rootItem;
}
private TreeView buildFileTreeView() {
tree = new TreeView<Path>(getRootItem());
tree.getSelectionModel().setSelectionMode(SelectionMode.MULTIPLE);
tree.setCellFactory((TreeView<Path> t) -> new TreeCellImpl());
return tree;
}Link to view source code: FileTreeView.java
2.2. File Tree Items
A file tree has a root directory and within it there are files and directories (or folders). A file is a leaf node without any branches. A directory, a branch node, has more directories and files. The file tree has a root directory item, directory items and file items.
The tree item is an example of the Composite design pattern (https://en.wikipedia.org/wiki/Composite_pattern).
2.2.1. FileTreeItem
A CheckBoxTreeItem renders a CheckBox and allows the user to check or uncheck the items in the tree. In this app the items are represented using a custom item class FileTreeItem; this extends CheckBoxTreeItem<Path>.
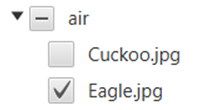
The following picture shows the tree items rendered as check boxes with file names:
FileTreeItem has code to build the file tree by traversing the tree nodes and their children (directories and files) recursively. There are two methods that are overridden of the TreeItem class, getChildren() and isLeaf(). The getChildren() method returns a collection ObservableList<TreeItem<Path>> for a given file's Path. The isLeaf() method returns a boolean specifying if the tree node is a leaf (a file) or not a leaf (a directory) which can be drilled down.
Link to view source code: FileTreeItem.java
2.2.2. File Name Rendering
The TreeView's items are rendered as check boxes with the file names. The file names are rendered by setting the TreeView's cell factory with custom TreeCells. The cell factory is a CallBack's call method which returns a CheckBoxTreeCell<Path>. The TreeCellImpl inner class extends CheckBoxTreeCell<Path> and overrides its update() method to display the Path object's file name property using the Path's getFileName() method.
The following code snippet shows the tree's cell factory setup:
tree.setCellFactory((TreeView<Path> t) -> new TreeCellImpl());Link to view source code: TreeCellImpl.java
2.3. Expand or Collapse the File Tree
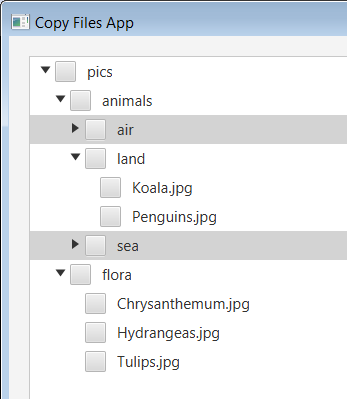
The file tree can be expanded or collapsed. There are two buttons for these actions in the main view; the picture below shows the buttons. The root directory item and the node directory items can be expanded or collapsed to show or not-show the child items within them respectively.

The first button is to expand or collapse the entire file tree. On pressing this, the entire tree is expanded to the last leaf node down the hierarchy. This button has a toggle action, it allows expansion in case the tree is in a collapsed state and vice-versa.
The second button is to expand or collapse only the selected directory nodes (like selecting an item in a list; this is not the checkbox checking). Multiple directory nodes can be selected and then expanded or collapsed. Like the first button this has a toggle action to expand or collapse the selected nodes.
The following picture has three images. The first shows the file tree in a collapsed state. The second shows the tree in an expanded state. The third shows two directory nodes in a collapsed state; note that the two nodes "air" and "sea" are selected and collapsed.
The following code snippet shows the two button's configuration. Note the button labels are symbols, pairs of single (‹ ›) or double guillemets (« »).
Button expandAllBtn = new Button('\u00AB' + " " + '\u00BB');
expandAllBtn.setOnAction(actionEvent -> expandOrCollapseTreeRoutine());
Button expandBtn = new Button('\u2039' + " " + '\u203A');
expandBtn.setOnAction(actionEvent -> expandOrCollapseSelectedItemsRoutine());
The following code snippets show the expand/collapse tree routine:
private void expandOrCollapseTreeRoutine() {
    FileTreeItem rootItem = (FileTreeItem) tree.getRoot();
    expandOrCollapseTree(rootItem);
    isExpanded = (isExpanded) ? false : true;
}
private void expandOrCollapseTree(FileTreeItem item) {
item.setExpanded((isExpanded) ? false : true);
item.getChildren().forEach(t -> expandOrCollapseTree((FileTreeItem) t));
}2.4. Collect Checked Items
The checked tree item values (Path objects) are collected and stored in a HashSet<Path> collection dynamically. This collecting is done by an event handler registered with the root tree item. The EventHandler class handles the TreeModificationEvent event type; this event will bubble up the CheckBoxTreeItem hierarchy, until the parent node is null.
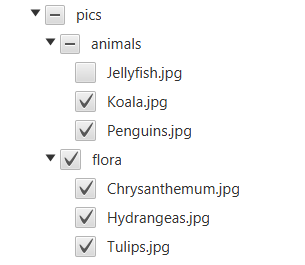
The handler's overridden handle() method adds or removes item values to the set collection on check or uncheck actions on tree item checkboxes. Both the directory and file node items can be checked or unchecked. For directory nodes there is also an indeterminate state, which indicates that not all items within the directory node are checked. Items with indeterminate state are also collected.
In the following picture the "pics" and "animals" directory node checkboxes are in indeterminate state. The "flora" directory node checkbox is in checked state.
The following code snippets show the code related with the root tree item's event handler to collect or remove items:
rootItem.addEventHandler(CheckBoxTreeItem.<Path>checkBoxSelectionChangedEvent(),
    (TreeModificationEvent<Path> e) -> handleItemCheckedEvent(e));
private void handleItemCheckedEvent(TreeModificationEvent<Path> e) {
FileTreeItem item = (FileTreeItem) e.getTreeItem();
if (item.isSelected() || item.isIndeterminate()) {
collectCheckedItems(item);
}
else {
removeCollectedCheckedItems(item);
}
}private void collectCheckedItems(FileTreeItem item) {
if (item.isSelected() || item.isIndeterminate()) {
// A file or directory is checked, or if a directory
// with files has some items checked: collect these items
checkedItems.add(item.getValue());
}
item.getChildren().forEach(t -> collectCheckedItems((FileTreeItem) t));
}Link to view source code: FileTreeView.java
3. Copy Files Dialog
In the app's main view, the root directory is chosen and items (files and directories) to be copied are checked. Then click the Copy dialog button to open the Copy Files dialog. The screenshot is shown below.
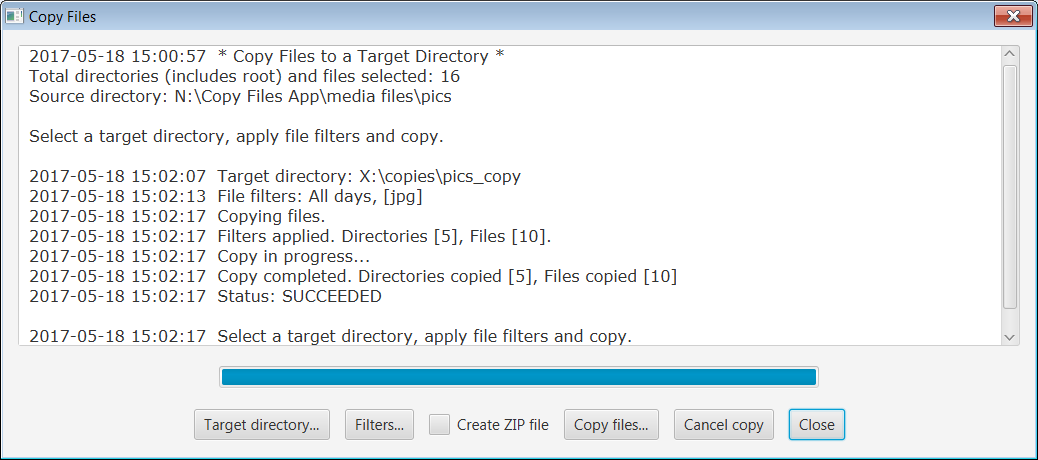
This dialog is built using a Stage control. This modal dialog has controls to capture additional input and complete the copy files process. This input is the target directory to which the selected files are to be copied to and a set of file filters to filter the selected files. There is also an option to create a ZIP file.
There are buttons to start the copy process, cancel the copy in progress and close the dialog. A status message area shows the details and result of the copy process. A progress bar indicates the copy progress.
Link to view source code: CopyDialog.java
3.1. Target Directory
A DirectoryChooser control lets the user to choose a target directory. There is a validation that this directory cannot be the same as that of the source directory or be within the source directory tree. In case the target directory is not empty a message is shown saying so; this is not an error.
3.2. File Filters
File filters are applied to the selected (checked) files from the source file tree. Applying the filters is optional. There are two filters, (i) date, and (ii) file type (or file extension). File filters are captured in the File Filters dialog shown in the picture below. This dialog is built using a Dialog control. The class FileFilter.java class defines the file filter info.
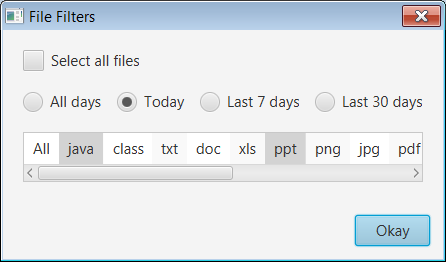
The Filters button action in the Copy Dialog opens the dialog. There are three sets of controls in the dialog. The first, a CheckBox to select all files, if checked this disables the other two options. In case this is not checked, select the remaining two options.
The date options are a group of Radio buttons. This option is to select files which are created or modified in the last 7 days or 30 days or just today or any day (all days). The option values are defined as an enum DateOption.
The second of the options is the file types. The file types are listed in a horizontal ListView. There is a list item "All" which specifies that all types of files are to be selected. One or more items in the list can be selected. In case All and other items are selected, All is considered. In case no item is selected in the list, All is considered.
The File Filters dialog returns an instance of FileFilter. In case the dialog is cancelled or filters are not set (i.e., the dialog is never opened) the default file filters are considered. The default value is all files with any date.
Link to view source code: DateOption.java, FileFilters.java, FileFilterDialog.java
3.3. ZIP File Option
There is an option to create a ZIP file for the copied files in the Copy Files dialog. Note that this option is available with Windows operating system only. A CheckBox control allows the user to select or unselect this option.
The section 5.3. ZIP File has details about the ZIP file creation.
3.4. Status Message Area
The Copy Files dialog has a status message area built with a TextArea control. This is a read-only text field with multiple rows of text messages. This displays the messages with information about: the source directory, number of files selected in the tree, the chosen target directory, the file filters applied, the copy action progress and result.
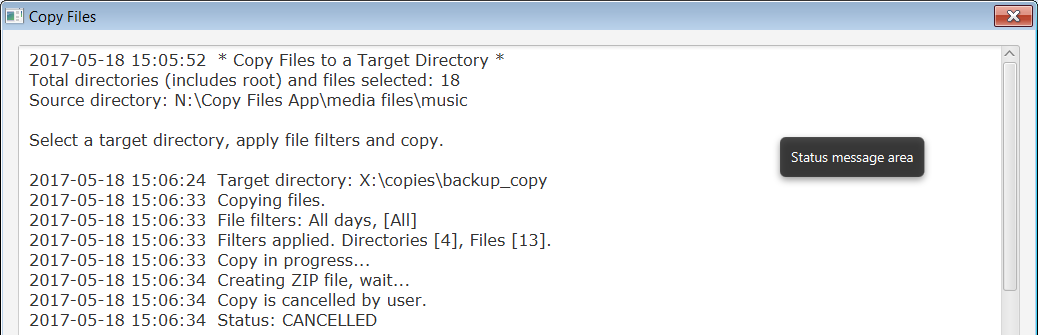
The status messages are displayed in the text area using the app's logging mechanism. The section 5.2. Logging has details.
4. Copy Files
This is initiated in the Copy Dialog with Copy files button action. The target directory is already chosen and the file filter options are set. As the copy process progresses the status messages are logged in the status area and a ProgressBar shows the process progress.
In the Copy Dialog tool bar, there are buttons to start the copy process and cancel it as shown in the following picture.

Link to view source code: CopyDialog.java
4.1. Copy Task
The copy process runs as a task. A task is defined by extending the javafx.concurrent.Task class and overriding its call() method.
Tasks are used to implement the logic of work that needs to be done on a background thread. In the app, run the background job of copying files, display the progress in the status area and update the progress bar simultaneously. The Task class is designed to be used with JavaFX GUI applications. It ensures that any changes to public properties, notifications for errors or cancellation, event handlers, and states occur on the JavaFX Application thread.
An article on Concurrency in JavaFX 8 at Oracle Corporation's website: https://docs.oracle.com/javase/8/javafx/interoperability-tutorial/concurrency.htm
4.1.1. Task State
The Task has a state. This is defined as javafx.concurrent.Worker.State enum. Three states are handled in this app; the SUCCEEDED, FAILED and CANCELLED.
The SUCCEEDED is a process completed successfully state. The FAILED state indicates that an exception has occurred during the process, for example this happens when the files copy throws an IOException. The CANCELLED state - while the copy process is in progress and the user initiates the task termination by clicking the Cancel copy button; the button's action runs the Task's cancel() method.
There are EventHandler's defined for the task state specifying actions when a state is set. For example, when the task is cancelled by the user the state is set as CANCELLED. The following code snippets show the cancel button configuration and the task's event handler code:
cancelBtn.setOnAction(e -> copyTask.cancel());copyTask.setOnCancelled(e -> {
logger.info("Copy is cancelled by user.");
logger.info("Status: " + copyTask.getState());
...
});4.1.2. copyRoutine()
The following code snippets show the Copy files button and its action routines. The code has details of the task definition, starting the task and the task state's event handlers.
copyBtn.setOnAction(e -> copyRoutine(selectedFiles));private void copyRoutine(Set<Path> inputSelectedFiles) {
copyTask = new Task<Void>() {
@Override
protected Void call() throws Exception {
logger.info("Copying files.");
Set<Path> filteredFiles =
applyFiltersToSelectedFiles(inputSelectedFiles);
...
logger.info("Filters applied. " +
"Directories [" + dirsCount + "], " +
"Files [" + filesCount + "].");
logger.info("Copy in progress...");
/*
* Walks the source file tree and copies the filtered
* source files to the target directory.
* The directories and files are copied.
*/
Files.walkFileTree(sourceDir, new SimpleFileVisitor<Path>() {
/*
* Copy the directories.
*/
@Override
public FileVisitResult preVisitDirectory(Path dir,
if (isCancelled()) {
// Task's isCancelled() method returns true
// when its cancel() is executed; in this app
// when the Cancel copy button is clicked.
// Here, the files copy is terminated.
return FileVisitResult.TERMINATE;
}
if (! filteredFiles.contains(dir)) {
return FileVisitResult.SKIP_SUBTREE;
}
Path target = targetDir.resolve(sourceDir.relativize(dir));
try {
Files.copy(dir, target);
copiedDirsCount++;
// Updates the Progess bar using the Task's
// updateProgress(workDone, max) method
updateProgress(++currentCounter, dirsCount+filesCount);
}
catch (FileAlreadyExistsException e) {
if (! Files.isDirectory(target)) {
throw e;
}
}
}
/*
* Copy the files.
*/
@Override
public FileVisitResult preVisitDirectory(Path file,
BasicFileAttributes attrs)
throws IOException {
if (isCancelled()) {
// Task's isCancelled() method
return FileVisitResult.TERMINATE;
}
if (filteredFiles.contains(file)) {
Files.copy(file,
targetDir.resolve(sourceDir.relativize(file)),
StandardCopyOption.REPLACE_EXISTING);
copiedFilesCount++;
// Task's updateProgress(workDone, max) method
updateProgress(++currentCounter,
dirsCount+filesCount);
}
return FileVisitResult.CONTINUE;
}
}); // end file tree walk
if (zipCheckBox.isSelected()) {
logger.info("Creating ZIP file, wait... ");
...
}
return null;
} // end call()
}; // end copyTask class
new Thread(copyTask).start(); // Run the copy task
// Calling event handlers as task's state is transitioned to
// SUCCEEDED, FAILED or CANCELLED.
copyTask.setOnFailed(e -> {
Throwable t = copyTask.getException();
logger.info("There was an error during the copy process:");
logger.info(t.toString());
}
copyTask.setOnCancelled(e -> {
logger.info("Copy is cancelled by user.");
});
copyTask.setOnSucceeded(e -> {
logger.info("Copy completed. " +
"Directories copied [" +
((copiedDirsCount < 1) ? 0 : copiedDirsCount) + "], " +
"Files copied [" + copiedFilesCount + "]");
doTaskEventCloseRoutine(copyTask);
});
}4.1.3. Apply the File Filters
The copy task starts with the file filters applied to the selected files (checked items from the file tree) and a filtered set of file and directory paths are arrived at. The following code snippet shows the file filter application:
private Set<Path> applyFileFilters(Set<Path> selectedFiles)
        throws IOException {
    if (fileFilters == null) {
        fileFilters = FileFilters.getDefault();
        logger.info("File filters: " + fileFilters.toString());
    }
    return new FileFilterApplication().apply(sourceDir, selectedFiles, fileFilters);
}
The FileFilterApplication.java class has an apply() method which returns a set collection of filtered files for the input filters and selected files. In addition to applying the filters, any empty directories after applying the filters are removed from the filtered list.
Link to view source code: FileFilterApplication.java
4.2. Files Copy
The file tree is traversed through its directories and files, at all levels starting at the root directory using the Files.walkFileTree() API of NIO 2. Each file and directory is checked if it is a filtered item and is copied to the target directory. Empty directories are not copied (a directory with files in the source selection may not have any files in the directory after the filter application).
At the end of the file tree walk, a status message shows the number of directories and files copied from the source to the target directories. In case the create ZIP file option is selected, a ZIP file is also created (details in the section 5.3. ZIP File).
At this point the copy is complete and another copy action can be initiated.
Note that the chosen target directory is not expected to be empty before the copy action. In case some files already exist they are replaced with the most recent ones. Any new files are added and other files are retained.
5. The Application
5.1. Application Starter
The AppStarter.java launches the app.
This class extends javafx.application.Application and overrides its start() abstract method, which is the main entry point for the JavaFX application. The start method has code to launch the app's main GUI.
@Override public void start(Stage primaryStage) {
    logger.info("Launching the GUI");
    new FileTreeView(primaryStage);
}
This class also has code that runs at the application initialization, the init() method, and at end the stop() method to close any open resources. These are Application class's overridden methods. The init method configures the logger and the stop method closes the logger's handlers.
Link to view source code: AppStarter.java
5.2. Logging
The app logs the status of the Copy Dialog's copy files action to the status message area, a TextArea control. In addition there is also general logging for the app to a log file and to the console.
The logging is implemented using the Java's logging API, defined in the jav.util.logging package. Two classes are created for this purpose of logging in this app. The first, LogFileHandler.java, extends the FileHandler class, this allows logging to a log file. The second one, TextAreaLogHandler.java, extends the StreamHandler class and this allows logging to the TeatArea control.
The format used to log is defined by the java.util.logging.SimpleFormatter.format system property and a LogRecord is formatted, for example, as shown below. This property is set from the command line (using the java -D option), the properties configuration file or within the Java code (using System.setProperty()).
[2017-05-12 14:27:06]  Launching the GUI
...
[2017-05-12 14:27:44]  Copying files...
[2017-05-12 14:27:48]  Filters applied. Directories [4], Files [14].
[2017-05-12 14:27:58]  Copy completed. Directories copied [0], Files copied [14].
In this app the logger and log file are configured in the AppStarter's init() method. The logging to the status message area is set in the CopyDialog.java class.
Link to view source code: LogFileHandler.java, TextAreaLogHandler.java
5.3. ZIP File
The app has the option to create a ZIP file for the copied files. The Copy Dialog has this option as a checkbox. This option is available only for Windows operating system.
The ZIP file is created in the same directory as that of the target directory and has the same name as that of the target directory with ".zip" file extension.
The ZIP file creation is implemented using the API from java.util.zip package. The classes used are ZipEntry and ZipOutputStream. The app has a ZipFileCreater.java class with a static method zip(), and this has code to accept the copied files directory as input, creates the ZIP file and returns its path. In the app the ZIP file creation status is shown in the message area of the Copy Dialog.
Here is a technical article about the Java's ZIP API at Orale Corporation's website: http://www.oracle.com/technetwork/articles/java/compress-1565076.html
The following code snippet from ZipFileCreater shows the creating the ZIP file:
public static String zip(Path input)
        throws IOException {
    ...
    ZipOutputStream zipOutputStream =
                new ZipOutputStream(new FileOutputStream(targetPathStr));
    Files.walkFileTree(source, new SimpleFileVisitor<Path>() {
        @Override
        public FileVisitResult visitFile(Path file, BasicFileAttributes attrs)
                throws IOException {
            Path targetfile = input.relativize(file);
            ZipEntry zipEntry = new ZipEntry(targetfile.toString());
            zipOutputStream.putNextEntry(zipEntry);
            try(FileInputStream fileInputStream =
                    new FileInputStream(file.toString())) {
                byte [] buf = new byte [256];
                int bytesRead;
                while ((bytesRead = fileInputStream.read(buf)) > 0) {
                    zipOutputStream.write(buf, 0, bytesRead);
                }
            }
            zipOutputStream.closeEntry();
            return FileVisitResult.CONTINUE;
        }
    });
...
Link to view source code: ZipFileCreater.java
6. Download
Download the Java source code for the example: copyfiles-app.zip
7. Useful Links and Notes
7.1. Links
- Java SE 8 API: https://docs.oracle.com/javase/8/docs/api
- JavaFX 8 API: https://docs.oracle.com/javase/8/javafx/api/toc.htm
- JavaFX: http://docs.oracle.com/javase/8/javase-clienttechnologies.htm
7.2. Notes on GUI Performance
The app is develped and run on a PC with Windows 7 operating system, 8 GB memory and Intel Core i3 processor.
The app's GUI (the tree view) works fine with a file system containing a few hundreds of files and directories. The first expand tree action response is copacetic. As the number of files increases to few thousands it takes some time (like 5 to 10 seconds). As the number of files increase reaching five digit numbers, the expand tree action freezes the GUI, and there was a message on the app window's title bar saying "Not responding". In general, these observations varied slightly depending on the type and size of files and the number of files in the tree.
Return to top